 Deal
How to Host a Successful Garage Sale — From Start to Finish
Ten chapters with practical tasks. Work in order or return to the stage you need.
CHAPTER 1 OF 10
Planning Your Garage Sale
Choose your venue, date and hours; review local rules, weather, helpers, expenses and expectations. Use the dated 14-day timeline before committing.
Define success before choosing a date
Write down your main goal: clear a room, earn money from useful belongings, or join a neighborhood event. Choose one primary goal so you can resolve tradeoffs. A household trying to reclaim a garage should not spend three weekends researching every paperback. A seller with a few valuable pieces may be better served by specialist listings. Count the goods you can realistically clean, test and label; do not advertise an enormous sale simply because you have many unsorted boxes.
Choose a venue and check its constraints
Measure the usable space after allowing for entrances, emergency access and a checkout queue. A garage provides some shelter but can expose tools and private possessions. A driveway makes loading easier but needs a plan for parking and moving vehicles. A yard needs firm, stable surfaces. A community event can share promotion but requires agreed responsibilities. Ask your municipality about permits, sale-frequency limits and signs, and check landlord or association rules. Requirements differ across US and Canadian jurisdictions; an app listing is not a permit.
Select hours around shoppers and helpers
Review nearby advertised sales and ask neighbors when they usually shop. A Saturday morning may fit your area, but shift work, religious observances, seasonal heat and community events can change demand. Choose hours you can staff, including setup and cleanup. For example, an advertised 8 a.m.–noon sale might require helpers from 7 a.m. until 1 p.m. Publish each day's hours separately. A short, well-prepared event is easier to manage than extending hours without enough merchandise or help.
Make a modest budget
List permit costs if applicable, supplies, equipment rental, advertising and disposal costs. Borrow stable tables and use existing bags where suitable. Separate the opening cash float from expenses: it is money you already own, not a cost or sale revenue. Estimate how many goods might sell at your likely average price, then subtract expenses using the earnings calculator. Test a low-sales scenario before spending. Neither foot traffic nor revenue is guaranteed.
Work backward and make a fallback decision
Use the timeline tool to assign tasks fourteen, seven, three and one day before the event. Give each task an owner and a small deadline. Check forecasts again close to the sale and decide what conditions mean moving, postponing or cancelling. Tell helpers how you will announce a change. If moving indoors would block safe access or expose private rooms, postponement may be more practical. Update your existing listing rather than creating conflicting copies.
Coordinate households in writing
For shared sales, agree who supplies tables, where each household's goods go, how prices are identified and how proceeds are divided. Give each seller a short code on tags and record that code at checkout. Decide whether one cashier collects all payments or each household runs its own table. Set boundaries on discounts: a helper should not negotiate another household's minimum without permission. Confirm permission before publishing anyone else's address.
A household with 80 prepared items estimates that half may sell for an average of $5. That scenario gives $200 gross. With $35 in supplies, estimated net proceeds are $165. If only 25 items sell at that price, net is $90. These are planning examples in your chosen currency, not predicted earnings.
Your 14-day preparation timeline
- Two weeks before: Choose a date and backup plan. Check local permit, signage and property rules. Sort items into sell, keep, donate and recycle. Ask helpers and participating households to confirm.
- One week before: Research comparable sold prices. Test goods and check official recall databases. Create or update your DealDrive listing. Share accurate dates, hours and permitted location details.
- Three days before: Clean and label merchandise. Prepare tables and racks; check stability. Print signs and check placement permissions. Review the forecast and cancellation plan.
- The day before: Prepare change and verify payment accounts. Charge devices and pack bags and wrapping. Confirm helper roles and parking arrangements. Check every advertisement for accurate details.
- Sale morning: Walk the accessible browsing route. Secure private areas and spare cash. Place permitted signs and open at the published time. Record your opening cash float separately.
- During the sale: Confirm totals before taking payment. Verify payments in your own account. Mark sold goods and record actual selling prices. Keep walkways clear and review weather conditions.
- After the sale: Close the listing and remove temporary signs. Count proceeds privately and subtract the opening float. Record costs and review results. Donate accepted leftovers or arrange appropriate recycling.
CHAPTER 2 OF 10
Deciding What to Sell
Evaluate clothing, furniture, tools, toys, books, electronics, kitchenware, sports equipment and collectibles. Separate specialist items and exclude unsafe merchandise.
Make an item-by-item decision
Start with goods you own and have permission to sell. Use four clearly separated areas: sell, keep, donate and recycle. Create a fifth research area for unfamiliar collectibles or potentially valuable items. Clothing should be clean and inspected for tears and stains; toys need component checks; books need a check for damp, missing pages and personal papers. Kitchenware should be clean and complete enough to use as described. Tools and sports equipment need particular attention to damage and safety.
Screen before spending time cleaning
Record brands, models and identifying labels for children's products, appliances and other safety-sensitive goods. Check official recalls and current resale guidance. Do not assume that an old product is safe because your family used it. Missing safety labels, unknown impact history or a damaged power cable are reasons to stop and investigate, not merely reduce the price. Keep recalled or prohibited goods out of sale and donation piles while following the manufacturer or authority's instructions.
Choose a suitable sales channel
Everyday household items can work well at a garage sale because buyers can inspect them immediately. Scarce collectibles, specialist tools, authenticated antiques and high-value equipment may benefit from an appraiser, specialist dealer or targeted marketplace. Research completed comparable sales, including fees and shipping, before deciding. A high online asking price does not establish value. If research is unfinished, keep the item out of this weekend's sale rather than accepting a hurried offer.
Before: a tangled box contains a game console, several cables and unrelated controllers. After: the tested console is paired with its compatible power supply, the controller's sticky button is disclosed, personal accounts are removed and a label lists exactly what is included.
CHAPTER 3 OF 10
Pricing Items Correctly
Compare similar used goods, record condition, choose asking and minimum prices, and plan bundles and later reductions.
Build useful comparisons
Choose several examples that match the item, brand, model, condition and completeness. Prefer completed transactions when available. Separate shipping from the item price and remember that an online seller may pay fees or provide returns. Local demand matters: a bulky desk may have fewer immediate buyers than a small appliance. Record your evidence alongside the asking price, not just the highest number you found.
Price categories using the right unit
For clothing, compare size, brand, wear and whether pieces form an outfit. For books, distinguish ordinary reading copies from collectible editions. For furniture, include dimensions, stability, finish and loading requirements. For tools, note brand, missing components and safe function. Toys and games need completeness checks; electronics need a test record and accessories. Price kitchen sets as sets only when the contents are clear. A bundle's count should appear on the label.
Choose your asking price and a private floor
Set an opening price you can explain and a minimum you would accept for each valuable piece. The gap is your negotiation room, not a promise of a discount. Keep minimums in a private note or inventory sheet. If your minimum is close to a specialist market value, consider another sales channel. Avoid raising a posted price when you see interest: consistent pricing helps prevent arguments.
Use bundles selectively
Bundle related inexpensive goods that a buyer can use together. For example, three ordinary paperbacks for $5 instead of $2 each illustrates a quantity discount; it is not a market valuation. Keep valuable books separate. A mixed box with hidden damage creates distrust. State whether buyers can choose the items and whether the offer applies to all goods in the category.
Plan reductions before opening
Choose a review time, such as the final hour, and decide which goods can be reduced. Change tags or display a clear sign explaining the scope of the discount. Do not apply a blanket half-price notice if some goods are excluded without identifying those exceptions. Avoid contradictory arithmetic: if tags are already reduced, tell buyers whether another discount applies.
Brief the person taking payment
Give helpers a clear list of firm prices and bundle rules. Agree how they will ask you about offers without announcing private minimums to everyone. At checkout, identify the goods, calculate the total and confirm it before payment. Mark the actual received amount in the tracker. Asking-price totals are not earnings; only completed paid sales belong in revenue.
Illustrative pricing worksheet: a lamp is labelled $15, your private minimum is $10, and a matching shade is included. A buyer offers $8. You respond, 'I can do $12 with the shade.' If the buyer takes a separate $4 basket, you might agree $15 for both only if that fits your minimums.
Category pricing examples
These invented examples illustrate pricing units and bundles, not market valuations or recommended prices. Use either USD or CAD consistently; the numbers are not currency conversions. Research your exact goods locally.
| Category | Example item | Illustrative tag | Check first |
|---|---|---|---|
| Clothing | Clean everyday shirt | $3 each; two for $5 | Separate valuable brands and disclose stains or repairs. |
| Books | Common reading copies | $2 each; three for $5 | Research signed, scarce or specialist editions separately. |
| Toys | Complete board game | $6 for the complete game | Count pieces and check recalls before offering it. |
| Kitchenware | Matching set of four mugs | $8 for the set | State the number of pieces and disclose chips. |
| Tools | Used hand-tool set | $12 for the listed pieces | Verify brand, wear and completeness before comparing prices. |
| Electronics | Tested basic speaker with charger | $15 for device and charger | Exact model, battery condition and missing accessories change value. |
| Furniture | Used side table with disclosed wear | $30 asking; private minimum $20 | Record dimensions and collection requirements. |
| Sporting goods | Used non-protective equipment | $10 for the described item | Size, condition and season affect demand; screen safety-sensitive goods. |
| Collectibles | Unidentified marked vase | Research before pricing | Do not infer authenticity or rarity from age or appearance. |
CHAPTER 4 OF 10
Preparing Merchandise
Clean, test, inspect, assemble where safe, group accessories, label defects and photograph useful details.
Clean with the material in mind
Follow care labels and manufacturer instructions. Dust and wipe appropriate surfaces, wash suitable textiles and dry everything fully. Avoid aggressive polishing of antiques or removing labels that help identify an item. Cleaning should reveal condition, not conceal defects. Keep damaged finishes visible in both photographs and descriptions. If a stain remains, show and describe it. Separate strong-smelling or damp items from clean goods.
Test and record the limits of your test
For electronics, use a suitable supply and check ordinary functions safely. Record the test date, included accessories, battery behavior and anything not tested. Remove accounts, personal files, SIM and memory cards using manufacturer guidance. Resetting a device may not remove activation locks; confirm that the next owner can set it up. Do not plug in visibly damaged equipment merely to demonstrate that it powers on. Use a specialist when testing is unsafe or uncertain.
Make inspection easy
Bag matching small parts and attach them to the main item without damaging it. Assemble furniture only where appropriate and safe, and record dimensions. Group clothing by size, books by topic and kitchen sets by what is actually included. Give every item an identifier if you will use the inventory tracker. Photograph the whole item, a useful detail and any defect. A buyer should understand what they are paying for without opening five unrelated bags.
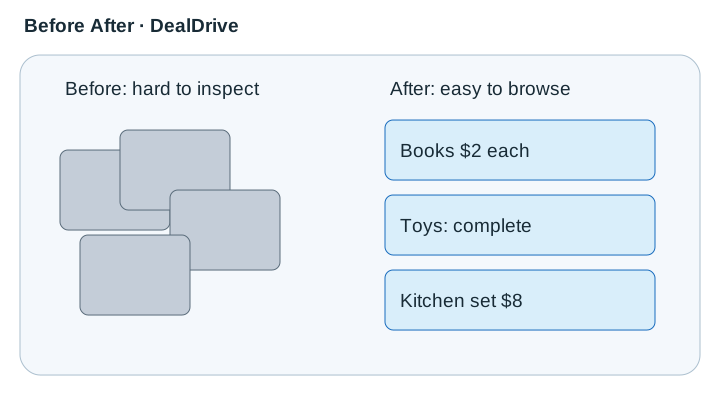
Before: a tangled box contains a game console, several cables and unrelated controllers. After: the tested console is paired with its compatible power supply, the controller's sticky button is disclosed, personal accounts are removed and a label lists exactly what is included.
 View diagram at full size (opens an enlarged view) ↗
CHAPTER 5 OF 10
Designing the Sale Layout
Choose a driveway, garage, yard or multi-family layout. Plan checkout, accessible paths, category tables, shade and collection space.
Measure the space people can actually use
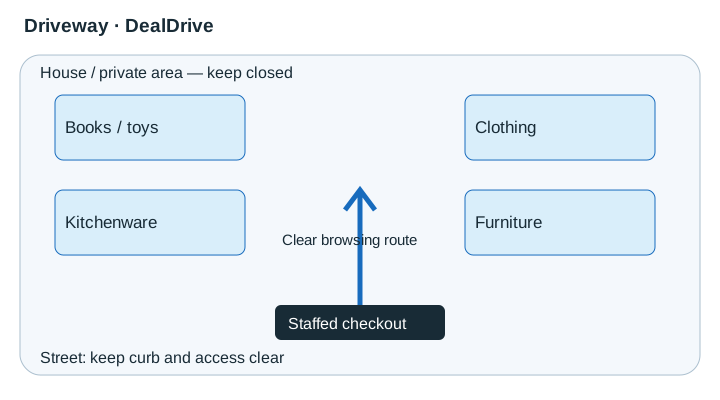
Draw the boundaries, doors, slopes, steps and fixed obstacles. Reserve safe circulation before placing tables. Paths need to remain usable when someone stops to browse or carries a purchase. Do not rely on a single narrow channel that becomes blocked by a queue. The diagrams below are conceptual arrangements, not scaled accessibility or building-code plans; check your own space and applicable requirements.
Choose a layout that fits the venue
A small driveway often works with category tables along the sides and an open center. A single garage needs a clear entrance and separation from private storage. A double garage can use two browsing areas with a wide shared route. In a front yard, prefer stable surfaces and keep fragile goods away from uneven ground. A large multi-family event needs numbered areas, a visible information point and agreed collection routes.
Keep checkout visible without creating a bottleneck
Place a staffed payment station near the exit while leaving room for buyers to pass. Keep wrapping supplies within reach and spare cash out of view. A helper can wrap purchases while the cashier checks totals. For large goods, agree pickup arrangements at checkout and mark paid items clearly so they are not sold again.
Group goods around real shopping tasks
Clothing racks should be stable and grouped by size. Put books upright or in shallow boxes with spines visible. Place small kitchen goods in defined sets, tools where they can be supervised and furniture where measurements can be read without climbing over other stock. Keep children's browsing areas away from breakable goods and vehicle movements. Heavy goods belong on stable low supports.
Make labels readable from the browsing side
Use plain type, contrast and an unambiguous price. Attach labels without harming finishes. A sign reading 'All books on this table: $2 each' works only if every book on that table qualifies. Use a separate area for exceptions. Do not place posters where wind can send them into walkways.
Walk the route with a helper
Pretend to enter, inspect a low item, carry a bag, join checkout and leave. Check sightlines, corners and shade. Ask whether a person using a mobility aid can approach goods without moving furniture. Adjust the layout when queues form. Keep private doors secured, supervision continuous and emergency access unobstructed.
A two-table driveway sale places books and kitchenware on one side and toys and folded clothing on the other. A stable clothing rack sits beside, not across, the browsing route. Checkout is visible at the end; furniture collection is arranged separately so vehicles do not enter the browsing space.
 View diagram at full size (opens an enlarged view) ↗
CHAPTER 6 OF 10
Advertising the Sale
Write a specific title and accurate description, choose representative photographs, share your listing and update every channel when plans change.
Start with a useful listing
Advertising cannot compensate for missing hours or unclear merchandise. Build one accurate listing with date, time, general area, representative goods and photographs. Keep its share link as the reference for all promotion. People should be able to decide whether to visit without sending you basic questions.
Choose a small number of relevant channels
Consider local community groups, neighborhood newsletters, permitted notice boards and your own social accounts. Check each group's rules before posting promotional material. A small local audience can be more useful than a large audience far away. Do not repost repeatedly or send unsolicited bulk messages.
Adapt the caption to the destination
A Facebook community post can explain categories and practical details. Instagram benefits from a clear image and a caption that tells viewers where to find the listing link; links in ordinary captions may not be clickable. X requires tighter copy; the tool warns when its draft is long, and the platform's composer remains the final length check. Never omit the date just to fit a slogan.
Show merchandise, not just boxes
Choose a small number of clear photographs representing what is actually available. A neat table of labelled kitchenware communicates more than a dark garage full of bags. Include recognizable furniture or tools when they are part of the sale, and show material defects. Avoid other people's images and identify illustrative examples as examples.
Schedule useful reminders
Publish once your details are stable, then make a relevant reminder close to the event where allowed. Correct time or weather changes promptly. Avoid announcing a sale so early that all the details change, or so late that neighbors cannot plan. Ask participating households to share the same accurate link.
Learn which promotion helped
Ask shoppers voluntarily how they heard about the sale and tally broad channels without collecting names. Compare those tallies with listing views or link clicks when available. Clicks do not prove attendance or purchases. Record what you actually measured and leave unknowns unknown. Use the results worksheet to choose next time's effort.
Facebook draft: 'Garage sale this Saturday, 9–1, near Maple Park. Garden tools, puzzles, books and kitchenware. Photos and current details: [your DealDrive link]. Please check the listing for weather updates.' An Instagram version can use a square goods photo with date and general area, plus a caption directing viewers to a usable profile or story link.
CHAPTER 7 OF 10
Preparing for Opening Day
Prepare tables, racks, tags, payment supplies, bags, weather protection, signs, parking arrangements and helper roles.
Use the checklist as a schedule
Choose the sale date in the timeline tool and work backward. The stages are prompts, not fixed legal deadlines: permits, borrowed equipment or large household clearances may need longer. Read through every stage before starting so a later dependency does not surprise you.
Assign ownership
Write a helper's name next to tasks on a printed copy or agree roles verbally. One person should keep the public dates and hours consistent. Another can prepare labels and displays. If a task has no owner, it is easy for everyone to assume someone else completed it.
Check outcomes rather than effort
'Electronics tested' means appropriate functions were checked safely and limitations recorded, not merely that cables were found. 'Listing ready' means the public preview has been reviewed. 'Payments prepared' means the account can be accessed and its status understood. Check a box when the result is ready.
Keep a practical opening kit
Pack price labels, pens, permitted sign materials, change, charged devices, bags, wrapping and drinking water. Keep the kit separate from merchandise. Store personal documents and spare cash out of sight. Confirm who is responsible for the kit and how checkout is covered during breaks.
Recheck changing conditions
Weather, helpers and stock can change after a box was checked. Review the forecast and public details again before opening. Do not treat a completed checklist as proof that a setup remains safe. Pause and revise the plan if access, payment systems or conditions change.
Finish the after-sale stage
Count receipts privately, subtract the float, record costs and decide each leftover item's destination. Close listings and remove signs. Return borrowed equipment and clear the property. Use the inventory totals to assess what sold and what needed more attention.
The preparation bar shows 80% complete, but the remaining tasks include confirming weather and checking payment access. Those tasks matter more than a high percentage. The seller finishes essential checks before opening instead of treating the progress bar as permission to start.
CHAPTER 8 OF 10
Selling and Negotiating
Welcome visitors, handle offers and bundles, manage busy moments and early arrivals, and verify payments.
Set boundaries
Choose firm prices and private minimums before opening. Share discount authority only with relevant helpers. If your minimum is above realistic local demand, consider another channel.
Understand the offer
Confirm which goods and accessories are included before responding. A low offer need not become an argument. State a price you can accept or decline politely.
Counter specifically
Say 'I can do twelve with the shade' or 'That one is firm, but these books can be bundled.' Avoid vague promises and unauthorized discounts on another household's stock.
Complete the agreement
Confirm the total, verify payment and record the actual price. Do not change agreed contents afterward. Pause disputes calmly and prioritize personal safety.
Buyer: 'Would you take five?' Seller: 'Ten is my lowest for this one.' Buyer: 'With the basket?' Seller: 'I can do twelve for both.' Either person may decline.
Set boundaries before the first offer
Write down the asking price, the lowest amount you are comfortable accepting and whether a bundle changes that minimum. Keep the minimum private unless you choose to disclose it during a conversation. For common low-value goods, a table-wide bundle rule can save time. For valuable items, research first and decide whether you are prepared to keep the item if it does not reach your minimum. Tell helpers which prices are fixed and which discounts they can approve. In a multi-family sale, a helper must not negotiate another owner's goods without permission. Having a policy reduces rushed decisions when several shoppers ask questions at once and makes it easier to be friendly without feeling obliged to accept every offer.
Respond to offers with a clear next step
Acknowledge the offer, state your price or counteroffer and leave room for a polite decision. Buyer: 'Would you take $5 for this $12 lamp?' Seller: 'Thanks for asking. I can do $10 because it includes the shade and I tested it this morning.' If the buyer declines, respond without argument: 'No problem; let me know if you change your mind.' Avoid inventing claims about another buyer or an item's value. If the price is firm, say so directly: 'This one is $12 firm today.' You can decline a sale without criticizing the shopper. If you need to consult another owner, label the item as awaiting a decision and give a realistic answer time rather than agreeing on their behalf.
Offer bundles that are easy to verify
A bundle should identify its contents and total price. 'Any three paperbacks from this tray for $5' is clear; 'take a few and we'll work something out' creates uncertainty. When a shopper brings goods from different categories, repeat the proposed items and total before payment. For example: 'The two mugs and the bowl would normally be $9. I can do all three for $7.' Check that the discount still fits your minimum and that no other household owns part of the bundle. Record the actual total, not the original tags, in your sales tracker. If several helpers work checkout, use the same rules so customers do not receive contradictory prices a few minutes apart.
Handle pressure, queues and disagreements calmly
When several people are waiting, finish one transaction accurately before starting another. Keep payment and change within that transaction until it is complete. For an early arrival, repeat the published opening time and keep private areas closed. If someone changes an offer while you are counting, stop and restate the agreed total. If a payment claim is disputed, check your own account or count the cash together in a controlled way; do not accept a screenshot as proof. Avoid escalating a disagreement over a small discount. You can end a transaction politely and seek help if a person becomes threatening. A sale is voluntary, and finishing safely is more valuable than winning an argument.
CHAPTER 9 OF 10
Closing the Sale
Plan final discounts, close at the advertised time, remove signs, secure proceeds and give remaining items a destination.
Choose destinations before sale day
Decide which leftovers you will keep, relist, donate or recycle. Check donation organizations' current acceptance rules, hours and pickup options. Bulky goods may require advance arrangements. A plan prevents the sale from simply moving clutter into a different room.
Apply a clear closing offer
At the time you chose, reduce selected goods or offer a defined bundle. Identify exclusions and avoid promising that everything is free unless you have permission from every owner. Do not make a desperate discount on a researched valuable item solely because closing is near.
Stop new browsing and finish transactions
Politely announce closing time, complete agreed purchases and clarify pickup arrangements. Mark paid goods and keep them separate. Close or update the DealDrive listing and external posts. Remove temporary signs and any tape, stakes or ties you placed with permission.
Reconcile money privately
Count cash away from customers, subtract the opening float and add confirmed digital receipts. Record expenses separately. For multi-family sales, reconcile seller codes and agreed shared costs before distributing proceeds. Keep a simple record of any discrepancy to investigate rather than guessing.
Sort leftovers again
Condition may have changed during the event. Recheck goods before donating or relisting them. Do not donate recalled, unsafe or unusable items. Remove personal data from electronics and use appropriate collection programs for batteries and hazardous materials. Ask the local waste authority about accepted routes; curbside rules vary.
Give the task a deadline
Set a date for donation drop-off, collection or a specialist listing. Keep only items you intentionally want. Photograph and record selected goods for another channel, then clear the sale space and return borrowed equipment. A successful clear-out includes finishing the leftovers, not merely ending the transactions.
Of 60 listed items, 35 sell, 10 suitable items are accepted for donation, five are set aside for specialist listings and ten need another lawful disposal or reuse route. The seller records each destination so the remaining pile does not become an unexplained second inventory.
CHAPTER 10 OF 10
Reviewing Results
Calculate gross revenue, expenses, net proceeds and sell-through. Compare categories and measurable promotion results before planning another sale.
Define success
Choose net proceeds, space cleared or items sold as your primary measure. Count inventory before opening and treat bundles consistently as one row or individual pieces.
Calculate actual results
Gross revenue is completed sale prices. Net proceeds subtract event expenses. Remove the opening float from cash receipts and avoid counting transfers between your own accounts twice.
Compare sell-through
Divide sold items by listed items and multiply by 100. Report removed items separately so the denominator is understandable. Compare categories and preparation effort, not just the largest receipt.
Evaluate promotion honestly
Tally voluntary broad answers about how shoppers found you. Views and clicks are not confirmed visits or purchases. Keep unknown attribution unknown and avoid collecting names.
Choose one next improvement
Write one thing to repeat and one to change. Clearer sizes, earlier accurate promotion or better checkout placement may be more useful than higher advertising spend.
Forty of 80 listed items sell for $300. Expenses are $45, so net proceeds are $255 and sell-through is 50%. The $60 opening float is excluded.
Find the constraint before changing prices
Low revenue can come from too few visitors, unsuitable merchandise, unclear displays, ambitious prices or a short selling window. Those problems need different responses. If people cannot find the sale, reducing prices on unseen goods will not solve the main issue. If visitors browse but cannot identify prices or inspect items, improve labels and layout before assuming demand is absent. If shoppers repeatedly compare a common item with cheaper alternatives, revisit realistic secondhand comparisons. Make one useful change at a time where practical and note the result. Do not invent scarcity, inflate original prices or describe ordinary goods as rare to pressure visitors. Clear information and manageable transactions support both trust and efficient selling.
Calculate revenue, costs and sell-through correctly
Gross revenue is the amount actually received from completed sales. Expenses include supplies, advertising, permits or other costs you incurred for the event. Net proceeds equal gross revenue minus those expenses. The opening cash float belongs to you already: subtract it from closing cash when calculating cash receipts, but do not list it as an expense. Include verified digital payments once, avoiding double-counting transfers between your own accounts. Sell-through is items sold divided by items offered, multiplied by 100. Define an item consistently: if a boxed set was offered as one unit, count it as one unit in both numbers. The results worksheet helps calculate these figures, but accurate inputs still depend on a reliable transaction record.
Compare categories and offers with enough context
Use category totals to identify patterns without overinterpreting a tiny sample. Suppose you offer twenty kitchen items and sell fifteen, while offering two desks and selling one. The kitchen sell-through is 75% and the desk sell-through is 50%, but the single desk may produce more revenue. Record preparation effort, transportation difficulties and unsold volume alongside money. Track bundle totals as actual receipts rather than adding original tag prices. Ask visitors how they heard about the event if the moment is appropriate, and record only the broad source. Those informal answers can suggest which promotion helped but do not provide precise attribution. Weather, hours and the mix of goods can change between events, so comparisons are directional rather than controlled experiments.
Use a closing strategy that fits your goal
Decide before opening when you will review prices and which items may be reduced. Protect goods that need further research or another owner's approval. For ordinary leftovers, a clear category bundle can reduce negotiation time: for example, three selected books for an illustrative $5. Keep exclusions separate and confirm totals before payment. If your main goal is reclaiming space, an appropriate donation or recycling plan may be better than repeatedly extending the sale. If maximizing proceeds matters more, reserve worthwhile items for another suitable channel. Finish by writing three specific lessons, such as 'separate children's sizes,' 'update the photo when the desk sells' or 'borrow a rack instead of buying one.' Those changes are more useful than a vague intention to sell harder next time.